Using the Graphical Action Designer
Important: The Graphical Action Designer is only available in the Cloud version of Neurons for ITSM during the BETA phase.
The Graphical Action Designer enables you to create an action quickly and easily using graphical tools.
You can drag and drop new action types from the Action Designer List to the Design Area of the editor.
An existing action type can be selected to display in the Design Area, where it can be edited.
When added to the Design Area, the action is displayed on the Design Area as an action block and can be configured in the Settings section.
One or more new action types can be added to the Design Area. Add links between multiple action types to connect them in sequence order. An existing action type can be added to the Design Area, and then new action types added and linked to create a more complex action.
In this version of Neurons for ITSM, edits to existing actions made in the Graphical Action Designer are not picked up by the Classic Action Designer. Edits made in the Classic Action Designer to existing actions are picked up by the Graphical Action Designer.
To open the Graphical Action Designer:
1.Use any of the methods to add/edit an action as described in Using Actions.
This displays the Action Designer selection popup.
2.Select Graphical Action Designer.
Parts of the Graphical Action Designer
The Graphical Action Designer consists of three sections.
Graphical Action Designer
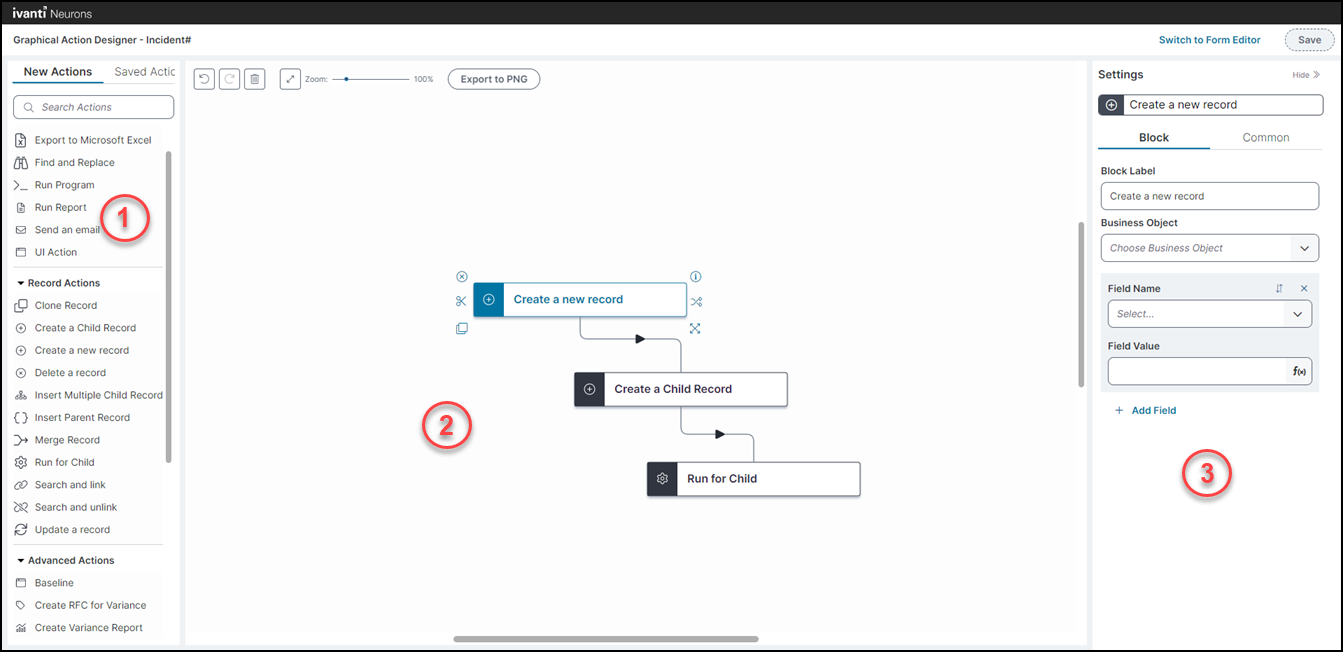
1 - Action Designer Lists
The action designer lists contain new and existing action types that you can add to the Design Area to create an action. There are two tabbed lists:
-
New Actions: Contains a limited set of the most commonly used actions. Drag an action type onto the Design Area to add it to your action.
-
Saved Actions: Contains a list of all current actions that exist for the business object. Select an existing action to add it to the Design Area. Actions you create and save are added to this list under No Category. You can also permanently delete an action from this list.
Use the Search Actions function to find the action you require.
For descriptions of all new action types available in the Graphical Action Designer, see the relevant section where they are described:
•Common Actions.
•Record Actions.
•Advanced Actions.
•Integration Actions.
2 - Design Area
This is where you build your action. Once added to the Design Area, select the action to enable configuration in the Settings section. You can add two or more actions to the Design Area to create a composite action, and create composite links between actions.
When you open a composite action from the Saved Actions list that was created in the Classic Action Designer, the diagram that is displayed can be manipulated to a design that you prefer.
General functions (located along the top of the Design Area):

-
Undo and redo an edit.
-
Clear the Design Area.
-
Fit diagram to the visible Design Area.
-
Zoom slider.
-
Export a diagram of the action to a PNG file. This displays the diagram and you can download it.
-
Switch to Form Editor. Located at the top right of the Graphical Action Designer window. Closes the Graphical Action Designer and opens the Classic Action Designer.
Any edits you have made in the Graphical Action Designer are lost if you switch to the Classic Action Designer.
-
Save. Located at the top right of the Graphical Action Designer window. The Save button is enabled (changes color to blue) when an action is configured to a state where it can be saved.
Action block functions. Select an action block to display these functions:

-
 Delete the action block.
 -
 Clone an action.
 -
 Create a link to another action block.
 -
 Delete a link to another action block.
 -
 View information about the action.
 -
 Resize an action block. Hover the mouse pointer over the icon, select and drag to the size you want.
3 - Settings section
Configure the settings for an action in this section. There are two tabs, Block and Common.
Block Tab
The Block tab is used to configure the settings specific to an individual action block. The fields and settings functions displayed may differ depending on the action selected. For information on specific fields and settings functions, see the action description.
Buttons present in the Block section for some actions open additional configuration editors and dialogs, for example: Clone Editor (for Clone Record action). Insert Child Record editor (for Insert Multiple Child Records action), Expression Editor (for various actions). There are several other editors and dialogs that can be opened from the Block section depending on the action selected.
When creating a new action that contains multiple actions, the Block Label field is displayed. You can use this field to give each block a unique name. This is useful to identify each action when you have more than one of the same type of action added or cloned in the Design Area.
Common Tab
The Common tab is used to configure settings that are common to the action block type, or to the composite action. For composite actions the configuration that is displayed in this tab is the same regardless of which action block is selected.
Creating a New Action
1.From the Configuration Console, click Build > Automation Tools > Quick Actions to open the Actions Manager workspace. The list of business objects that have actions appears.
2.Click Add/Edit to see the actions for the business object. The application displays the Action Designer selection popup.
3.Select Graphical Action Designer.
4.Select the New Actions tab to view a list of action guides. These guides are the basis for various actions.
5.Drag an action guide type onto the Design Area from the New Actions tab. The Settings section displays the Block and Common settings tabs for the action type.
6.Select each tab and enter data into the Block and Common configuration fields as required. Each action guide uses both common and specific fields. See Common Action Fields. For specific parameters and actions for the action type, see Action Templates.
7.Click Save.
The action appears in the Saved Actions tab depending on the category you applied to the action in the Common settings. For example, if you selected Form Actions from the Enter Category drop-down list in Common settings, the action will appear under the Form Actions section in the Saved Actions tab.
If you did not select a category in Common settings, the action appears under the No Category section of the Saved Actions tab.
Modifying an Action
You can change specific actions within an action. For example, you can change which fields are referenced within an action.
1.From the Configuration Console, click Build > Automation Tools > Quick Actions to open the Actions Manager workspace. The list of business objects that have actions appears.
2.Click Add/Edit to see the actions for the business object. The application displays the Action Designer selection popup.
3.Select Graphical Action Designer.
4.Select the action from the Saved Actions list. The action block (or blocks if it is a composite action) are displayed on the Design Area.
5.Select the action block.
6.Modify the configuration fields in the Block and Common configuration tabs in the Settings section as required. Each action guide uses both common and specific fields. See Common Action Fields. For specific parameters and actions for the action type, see Action Templates.
7.Click Save.
Adding Multiple Actions to an Action
See Adding Multiple Actions to an Action.
Disabling an Action
If you want to disable an action, use the Classic Action Editor to disable the action from there.
Any edits you have made in the Graphical Action Designer are lost if you switch to the Classic Action Designer.
Deleting an Action
You can only delete an action you have created, unless you are an administrator or have a role with delete permissions.
From the Configuration Console
1.From the Configuration console, click Build > Automation Tools > Quick Actions to open the Actions Manager workspace. The list of business objects that have actions appears.
2.Click Add/Edit to see the actions for the business object. The application displays the Action Designer selection popup.
3.Select Graphical Action Designer.
4.Click the Saved Actions tab and hover the mouse pointer over the action you want to delete. A Delete icon appears to the right of the action.
The Delete icon is only displayed when the Design Area is empty. If you have an action present in the Design Area you cannot use the delete function.
5.Click Delete. The Delete Confirmation window appears.
6.Click Yes.
From the Neurons for ITSM Application
1.Log in to Neurons for ITSM.
2.Open a workspace.
3.From the Action Menu, select Edit Actions. The application displays the Action Designer selection popup.
4.Select Graphical Action Designer.
5.Click the Saved Actions tab and hover the mouse pointer over the action you want to delete. A Delete icon appears to the right of the action.
The Delete icon is only displayed when the Design Area is empty. If you have an action present in the Design Area you cannot use the delete function.
6.Click Delete. The Delete Confirmation window appears.
7.Click Yes.